


DIY cloth clothes for action figures come down to three things: a custom paper pattern traced from your figure's own body, lightweight woven fabric under 4 oz, and thin wire stitched into the seams so the piece holds a pose. That's the whole process, compressed into one sentence.
Making a real fabric school uniform — blazer, shirt, trousers — for a 1/12 scale action figure sounds fussy. It is fussy. But the payoff is a soft, wire-shaped uniform that drapes over a posable figure's joints instead of cracking at them, with visible stitching you can photograph up close against a plain or classroom-style backdrop.
Custom soft goods beat factory plastic every time. Wire-core seams let you shape natural fabric folds around elbows and knees. Real cloth settles into a bent knee instead of fighting it. The difference shows up in every photo you take.
Why Wire Makes All the Difference in Mini Clothes
Factory action figure clothes look like what they are: molded plastic shells. They crack at stress points, limit articulation, and never settle into natural positions. Fabric clothes for action figures with bendable wire cores fix this, mostly.
Thin floral wire (24-26 gauge) sewn into seams creates structure you can't see but can absolutely feel. You can bend a blazer hem to flutter mid-stride, curve a trouser cuff around a boot, or shape a shirt collar to frame a figure's face against a neutral background. The wire holds whatever position you set, and it keeps holding it after fifteen re-poses in one afternoon.
I've watched collectors spend $200+ on a premium figure, then dress it in an $8 plastic outfit that looks like a toy from across the room. Wire-core fabric clothes cost more upfront but change the entire display shelf. Baki fans on Reddit bring up soft goods uniforms constantly when the conversation turns to recreating school scenes from the manga.
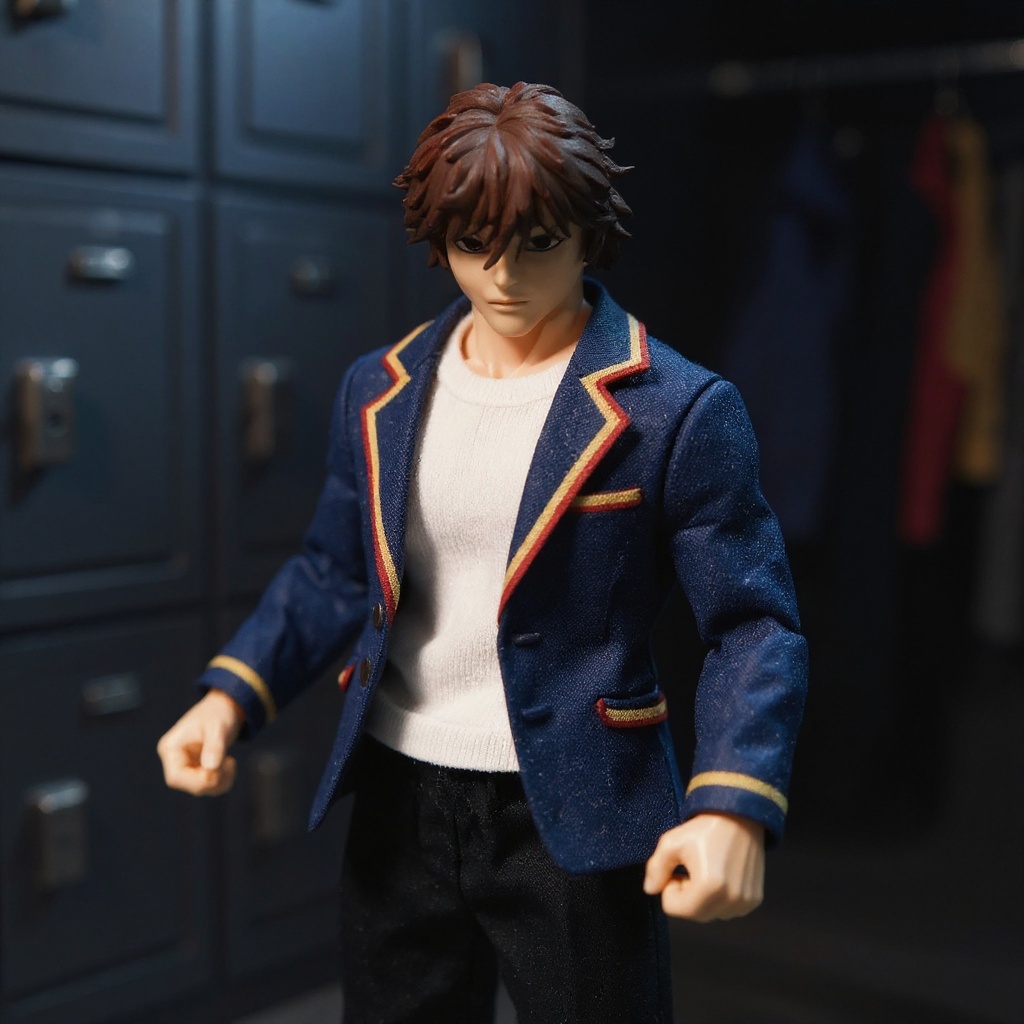
For reference, a pre-built option like this 1/12 Baki Hanma school uniform set ships with wire already shaped into the jacket lapels, trouser hems, and shirt collar. That's hours of fiddly hand-work someone else already did.

Fabric Selection for 1/12 Scale Success
Scale matters more than you'd guess walking into a fabric store. Regular cotton weighs too much and bunches on a 6-inch body. Silk looks great on camera but frays the moment you're working with 1/8-inch seam allowances.
Here's what actually works, based on outfits I've sewn and photographed:
| Fabric Type | Weight (oz/yd) | Best Use | Drawbacks |
|---|---|---|---|
| Cotton voile | 2-3 oz | Shirts, linings | Wrinkles fast, needs pressing before every shoot |
| Silk habotai | 3-4 oz | Formal blazers | $18-24/yd, frays within a season of handling |
| Polyester chiffon | 1-2 oz | Flowing capes, skirts | Static cling ruins flat-lay photos |
| Linen blend | 4-5 oz | Casual trousers | Looks stiff below 1/6 scale |
| Microfiber | 2-3 oz | Athletic wear | Only ships in 6-8 stock colors |
| Cotton lawn | 2 oz | Dress shirts, collars | Shows needle holes if you unpick twice |
Cotton voile wins for beginners. It's cheap, forgiving, and takes fabric paint without bleeding. Buy the lightest weight you can find — anything over 4 oz reads as bulky on a small figure, full stop.
Skip stretchy fabrics. Lycra and jersey knits don't scale down, they just distort. Stick to woven fabrics that behave the same way at 2 inches as they do at 2 feet.
Essential Tools You Actually Need
You don't need a $500 machine for this. A basic straight-stitch model handles 90% of the work. Hand-sewing works too. It just takes longer, and your eyes will thank you for a good lamp.
My actual tool list:
1. Sharp fabric scissors (Gingher 4-inch or similar) 2. Seam ripper for fixing mistakes 3. Quilting pins, shorter than regular dressmaking pins 4. Hand-sewing needles, size 10-12 5. 24-gauge floral wire from any craft store 6. Fabric glue for hems (Fabri-Tac held up on a set I made in 2021, still intact) 7. Small craft iron for pressing seams 8. Rotary cutter and mat for straight lines 9. French curve ruler for armholes 10. Thimble — you will stab yourself without one, ask me how I know
The rotary cutter changed how clean my seams looked. Cutting 2-inch pattern pieces with scissors gave me wobbly lines and a pile of frustrated re-cuts. A rotary cutter gives straight edges every single time.
Wire placement tools matter too. Needle-nose pliers bend tight curves in a lapel. Small hemostats grab wire ends buried in seams where fingers won't fit.
Step-by-Step: Sewing One Wire-Core Blazer
Here's the actual build sequence I use for a Baki-style school blazer, start to finish:
1. Trace the pattern from your figure using the plastic-wrap-and-tape method (see below). 2. Cut two front panels, one back panel, and two sleeves from cotton voile, adding 1/8-inch seam allowance. 3. Cut matching wire lengths 1/2 inch longer than the lapel and hem edges. 4. Baste the wire directly onto the seam line with loose hand stitches before joining panels. 5. Sew shoulder seams first, then side seams, catching the wire inside each seam. 6. Set the sleeves, easing extra fabric at the shoulder joint for arm articulation. 7. Press every seam flat before adding buttons — skipping this step is the fastest way to make a blazer look homemade.
A basic shirt takes 3-4 hours once you know this sequence. A full uniform, blazer plus shirt plus trousers, can eat an entire weekend the first few times through.
Pattern-Making Tricks for Tiny Proportions
Don't scale down human patterns. Action figures have exaggerated proportions: wider shoulders, narrower waists, legs longer than any real teenager's. You need patterns drafted for their specific body, not yours.
Start by wrapping your figure in plastic wrap, then masking tape. Draw seam lines on the tape with a fine Sharpie. Cut the tape shell off in one piece if you can, then flatten it out — that's your custom pattern, done in about twenty minutes.
This technique captures the exact shoulder width, arm reach, and torso length of one specific figure body. A pattern built for a Storm Collectibles body won't fit a Medicom figure. Not even close.
Add 1/8-inch seam allowances to everything. Smaller allowances fray before you can sew them. Larger ones create bulk that reads wrong at this scale.
Test-fit constantly. Pin pieces onto the figure before you sew a single final seam. Adjusting paper is fast. Unpicking thread from a 2-inch collar at 11pm is not.
Advanced Techniques for Realistic Details
Real clothing has structure you can't see from outside: interfacing in collars, shoulder pads in jackets, lining in the good stuff. These details matter at 1/12 scale too, maybe more, because the eye has nothing else to look at.
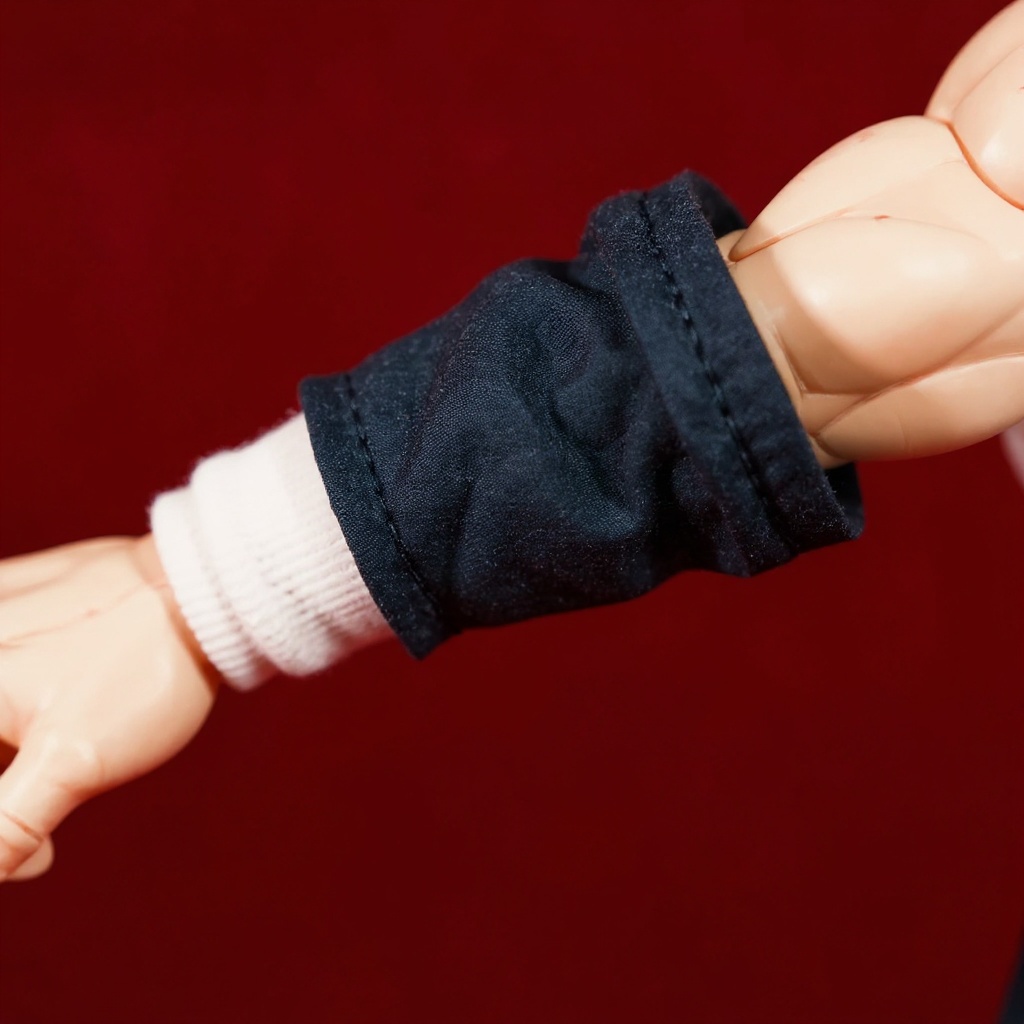
Use lightweight fusible interfacing on shirt collars and blazer lapels. Cut it slightly smaller than the fabric piece so it never peeks out at the edge. Iron it on before sewing — the added stiffness holds shape through repeated posing sessions.
French seams hide raw edges and add durability. Sew wrong-sides together with a 1/16-inch seam, trim close, turn right-side out, press flat, then stitch again with a 1/8-inch seam. The raw edge disappears inside the fold.
Tiny buttons (2mm) sell the illusion better than anything painted on. Real buttonholes, hand-sewn with a blanket stitch, take patience but read as authentic in photos. Working pockets add realism. They also eat two hours you didn't budget for.
The Baki manga series has distinctive uniform details fans notice immediately — specific button spacing, collar shape, jacket length. Getting those exact proportions right is what separates a display-shelf piece from something that just looks vaguely like a school uniform.Common Mistakes That Ruin the Look
Bulky seams kill the illusion. Every time. Double-folded hems look like tiny sleeping bags wrapped around a figure's legs — use single-fold hems with fabric glue instead.
Wrong thread weight causes problems too. Heavy denim-weight thread looks like rope on delicate voile. Use 50-weight cotton or polyester for most seams, 60-weight for the fine detail work around collars.
Color mismatch shows up fast at this scale. A jacket and trousers cut from slightly different dye lots of the "same" navy will look like a mistake, not a design choice. Buy all fabric for one outfit in a single purchase when you can. Static cling. Real problem with chiffon capes and skirts, and it will ruin a flat-lay photo you spent an hour setting up.
Overfitting causes range-of-motion problems. A blazer that barely fits a standing figure will bind and rip the first time you pose a dynamic kick. Leave extra ease through the shoulders and crotch, where the joints do the most work.
Skipping the iron shows up in every photo. Unpressed seams look homemade in the worst way. Not glamorous. Just necessary. A $15 craft iron fixes this in about ninety seconds per garment.
Honestly, if you live somewhere humid, think twice before wiring an outfit meant for long-term display — bare floral wire can rust inside the seam within a season and bleed a rust stain straight through light-colored fabric. Coat the wire in clear nail polish first, or skip wire in pieces that won't be posed often.
Why Buy Instead of DIY?
Honest talk: making quality figure clothes takes real time. A basic shirt needs 3-4 hours once you're experienced, 6-8 hours while you're still learning the pattern-drafting. A full uniform can swallow an entire weekend.
Handmade soft goods from someone who already climbed that learning curve save that time and usually beat first-attempt DIY results. Factory clothes run $15-25 but use stiff synthetic fabric with no wire shaping at all. Premium tailor-made sets run $50-80 with hand-finished buttonholes and interfacing.
A mid-tier option, like this $44 handmade uniform set for 1/12 figures, sits between those two: wire pre-shaped into the lapels and cuffs, correct fabric weight for the scale, and stitching built to survive repeated posing.
The time math matters. Twelve hours making one outfit versus buying three ready-made sets for a photography weekend — for most collectors, buying wins that trade every time.
Frequently Asked Questions
How do you make DIY cloth clothes for action figures? Wrap the figure in plastic wrap and tape to build a custom pattern, cut lightweight fabric (2-4 oz) from that pattern, sew thin 24-26 gauge wire into the seams, and keep seam allowances at 1/8 inch. Test-fit before every final seam. How do you make clothes for dolls with fabric? The method is close to figure clothing, but doll bodies are usually softer and less articulated. You can go up to 6 oz fabric weight and skip wire entirely for most doll outfits since the body doesn't need to hold dynamic poses. How do you make clothes for soft toys? Soft toy clothing tolerates bulk better than figures do. Stretch fabrics like jersey work fine, seams up to 1/4 inch are fine, and wire reinforcement isn't needed. Use velcro or snap closures since soft toy bodies compress when you're dressing them. How do you make a DIY action figure? That's a different project entirely — sculpting, molding, and articulation engineering, not sewing. Most collectors customize an existing figure body or commission a sculptor rather than building one from raw materials. What materials do people use to make capes and cloth for action figures? Cotton voile, silk habotai, and polyester chiffon are the three most common. Add 24-gauge floral wire along the cape edge for dramatic poses, and coat the wire in clear nail polish if the piece will stay wired long-term. Where can I buy action figure clothes if I don't want to sew my own? Specialty communities like r/actionfigures on Reddit point to both factory and handmade sellers. Etsy has independent makers, eBay carries mass-produced sets, and a handful of shops focus specifically on 1/12 scale soft goods with wire construction. What fabric is best for 1/12 scale figure clothes? Cotton voile at 2-3 oz is the most forgiving choice for beginners — cheap, easy to press, and it takes fabric paint without bleeding. Silk habotai looks more realistic on camera but frays fast and costs $18-24/yard. Stay under 4 oz for anything. Do I need a sewing machine to make action figure clothes? No. Hand-sewing works fine for garments this small, it just takes longer per piece — expect 5-6 hours by hand versus 3-4 on a machine for one shirt. A basic straight-stitch machine covers nearly everything you'll need. How much wire gauge should I use for a school blazer versus a cape? 24-gauge floral wire works for structured pieces like blazer lapels and trouser cuffs, where you want the shape to hold firm. Drop to 26-gauge for capes and flowing skirts — it bends easier and won't add visible weight to thin chiffon. Why does my fabric look bulky even at the right weight? Usually it's the seam allowance, not the fabric. Anything over 1/8 inch adds visible bulk at 1/12 scale, and double-folded hems make it worse. Switch to single-fold hems glued flat instead of sewn and pressed twice.Is DIY Worth Your Time and Effort?
Making your own figure clothes teaches real skills and gets you exactly what you pictured. It's not always the practical choice, though.
Factor in material costs ($10-15 per outfit), tool investment ($50-100 for basics), and the learning curve (months before your seams stop looking homemade). For one or two figures, buying makes more sense. For a large collection or a character nobody else makes, DIY earns its hours back.
The middle ground works well too: buy a base garment and modify it with custom colors or added wire. You get factory-grade construction with your own touches layered on top.
If you want authentic school uniform details — blazer, shirt, trousers, all wire-shaped — without the months of trial and error, this 1/12 Baki Hanma school uniform set already made the fabric and wire decisions. That frees you up to build scenes instead of wrestling with 2mm buttonholes.

